课程名称:数字图像处理
实验题目:自选课题-CLIP图片分类任务复现
姓名学号:柯劲帆21281280; 李桦炅21281282
班级:物联网2101班
指导老师:安高云
报告日期:2024年1月10日
---
**目录**
[TOC]
---
# 0. 报告摘要
本实验的主要工作是复现CLIP图片分类模型,使用CLIP在两个细粒度分类数据集上进行了finetune和测试,采用预训练Vision Transformer作为图片特征提取器,均实现了较高正确率的图片分类,验证了CLIP的图片分类功能在细粒度分类数据上的有效性。
| 小组成员名字 | 小组成员学号 | 工作贡献占比 |
| ------------ | ------------ | ------------ |
| 柯劲帆 | 21281280 | 70% |
| 李桦炅 | 21281282 | 30% |
# 1. 论文解读
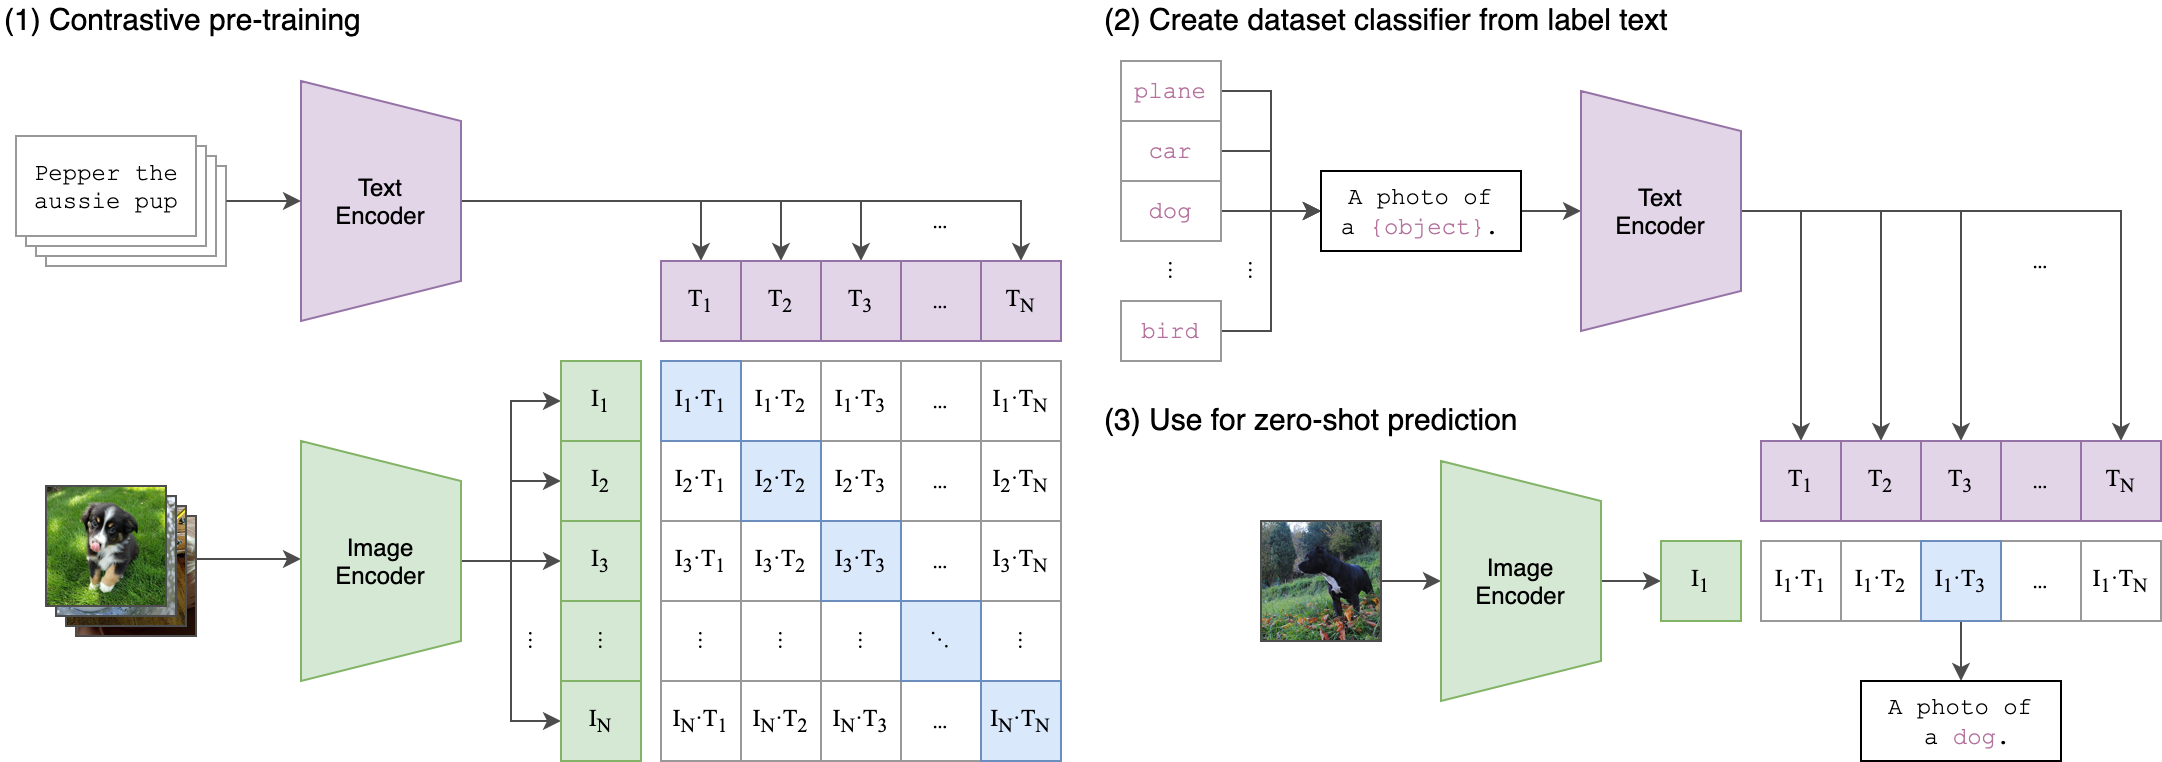
CLIP是OpenAI在2021年提出的一种深度学习图片分类方法。
CLIP基本算法原理相对比较简单:
1. 为了对图片和文本建立联系,首先分别对图片和文本进行特征提取。图片特征提取的backbone可以是Resnet系列模型也可以是VIT系列模型,文本特征提取一般采用Bert模型;
2. 特征提取之后,进行归一化,然后直接相乘来计算余弦距离,同一图片-文本对的结果趋近于1,不同图片-文本对的结果趋近于0,采用对比损失计算loss。这种计算loss方式效果与batch size有很大关系,一般需要比较大的batch size才能有效果。
模型图如下:
伪代码:
```python
# image_encoder - ResNet or Vision Transformer
# text_encoder - CBOW or Text Transformer
# I[n, h, w, c] - minibatch of aligned images
# T[n, l] - minibatch of aligned texts
# W_i[d_i, d_e] - learned proj of image to embed
# W_t[d_t, d_e] - learned proj of text to embed
# t - learned temperature parameter
# extract feature representations of each modality
I_f = image_encoder(I) #[n, d_i]
T_f = text_encoder(T) #[n, d_t]
# joint multimodal embedding [n, d_e]
I_e = l2_normalize(np.dot(I_f, W_i), axis=1)
T_e = l2_normalize(np.dot(T_f, W_t), axis=1)
# scaled pairwise cosine similarities [n, n]
logits = np.dot(I_e, T_e.T) * np.exp(t)
# symmetric loss function
labels = np.arange(n)
loss_i = cross_entropy_loss(logits, labels, axis=0)
loss_t = cross_entropy_loss(logits, labels, axis=1)
loss = (loss_i + loss_t)/2
```
# 2. 实验过程
本次实验我们复现了CLIP,在两个公开的数据集中对CLIP进行finetune,验证其正确率。
## 2.1. 实验环境
- NVIDIA A40服务器
## 2.2. 数据集下载
首先我们下载了用于finetune的两个数据集:
- [Caltech-UCSD Birds-200-2011 (CUB-200-2011)](https://paperswithcode.com/dataset/cub-200-2011)
- [Stanford Cars](https://paperswithcode.com/dataset/stanford-cars)
都是细粒度的图片分类数据集。
## 2.3. finetune代码
### 2.3.1. 数据集
在本任务中,数据为图片-文本对,因此需要对分类的下标和名字做一个映射,我们使用一个类实现:
```python
# get_loader.py
class Classes:
def __init__(self, classes_file):
self.class2index = {}
self.index2class = {}
classes = pd.read_csv(classes_file)
for index, row in classes.iterrows():
carname = row['class_names']
self.class2index['A photo of ' + carname] = index
self.index2class[index] = 'A photo of ' + carname
def __len__(self):
return len(self.class2index)
def get_class(self, num: int):
return self.index2class[num] if (num in self.index2class) else None
def get_id(self, class_name: str):
return (
self.class2index[class_name] if (class_name in self.class2index) else None
)
```
然后对本地的数据集进行读入。
两个数据集的存储形式不同:
- `CUB-200-2011`将训练集和测试集放在同一个文件夹中,以不同类别分文件夹存储,并使用一个表格文件存储图片名称的编号、一个表格存储图片编号的标签、一个表格文件存储图片编号对应的是训练/测试集;
- `Stanford Cars`将训练集和测试集分别放在不同的文件夹里,使用两个表格文件分别存储训练/测试集图片名称编号对应的标签。
因此,自定义`MyDataset`类需要针对不同数据集实现不同的读取逻辑。
读取`CUB-200-2011`的代码为:
```python
# get_loader.py
import clip
from PIL import Image
from torch.utils.data import Dataset
import os
class MyDataset(Dataset):
def __init__(self, processor, train=True):
classes = Classes('/home/kejingfan/cub/classes.txt')
class_list = [classes.get_class(i) for i in range(len(classes))]
self.tokens = clip.tokenize(class_list) # 对文本进行tokenize
self.img_process = processor
# 从表格中获取整个数据集的图片列表
self.root_dir = '/home/kejingfan/cub/images'
images_list = open('/home/kejingfan/cub/images.txt').readlines()
images_list = [line.strip().split(' ')[1] for line in images_list]
self.images = []
# 从表格中获取图片对应的标签
labels_file = open('/home/kejingfan/cub/image_class_labels.txt').readlines()
labels = [int(line.strip().split(' ')[1]) for line in labels_file]
# 从表格中获取图片对应的数据集
train_test_split_file = open('/home/kejingfan/cub/train_test_split.txt').readlines()
is_train = [line.strip().split(' ')[1] == '1' for line in train_test_split_file]
for index in range(len(images_list)): # 将对应数据集的图片放入列表中
class_id = labels[index]
if (train and is_train[index]) or (not train and not is_train[index]):
self.images.append([os.path.join(self.root_dir, images_list[index]), int(class_id) - 1])
def __len__(self):
return len(self.images)
def __getitem__(self, index):
image, target = self.images[index]
token = self.tokens[target]
image = Image.open(image).convert("RGB")
image = self.img_process(image) # 图片预处理
return image, token, target
```
读取`Stanford Cars`的代码仅在`__init__()`中与读取`CUB-200-2011`的代码有区别。`__init__()`如下:
```python
def __init__(self, processor, train=True):
classes = Classes('/home/kejingfan/cars/class_names.csv')
class_list = [classes.get_class(i) for i in range(len(classes))]
self.tokens = clip.tokenize(class_list) # 对文本进行tokenize
self.img_process = processor
# 选择相应数据集的文件夹
self.root_dir = '/home/kejingfan/cars' + ('/cars_' + ('train' if train else 'test')) * 2
# 选择相应数据集的标签
train_annos_file = '/home/kejingfan/cars/cars_train_annos.csv'
test_annos_file = '/home/kejingfan/cars/cars_test_annos_withlabels.csv'
images_list = pd.read_csv(train_annos_file if train else test_annos_file)
self.images = []
for index, row in images_list.iterrows(): # 将对应数据集的图片放入列表中
class_id = int(row['class'])
self.images.append([os.path.join(self.root_dir, row['fname']), class_id - 1])
```
### 2.3.2. 测试
用于判断训练的效果和进度。
```python
# test.py
import torch
import torch.nn
import clip
from PIL import Image
import argparse
import numpy as np
from tqdm import tqdm
from get_loader import Classes
def test(net, test_dataset, test_loader, device):
net.eval()
total_accuracy = 0.0
texts = test_dataset.tokens.to(device)
with torch.no_grad():
for index, (images, tokens, targets) in tqdm(enumerate(test_loader), total=len(test_loader)):
images = images.to(device)
logits_per_image, logits_per_text = net(images, texts)
probs = logits_per_image.softmax(dim=-1).cpu().numpy()
accuracy = np.sum(probs.argmax(1) == targets.numpy())
total_accuracy += accuracy
net.train()
return total_accuracy / len(test_dataset)
```
### 2.3.3. 训练
超参数设置为:
- batch_size = $64$
- learning_rate = $10^{-6}$
- Adam优化器
代码如下:
```python
# train.py
import torch
from torch import nn, optim
from torch.utils.data import DataLoader
from tqdm import tqdm
import clip
from get_loader import MyDataset
from test import test
def convert_models_to_fp32(model):
for p in model.parameters():
p.data = p.data.float()
p.grad.data = p.grad.data.float()
def train():
batch_size = 64
learning_rate = 1e-6
num_epochs = 500
device = torch.device("cuda:0" if torch.cuda.is_available() else "cpu")
net, preprocess = clip.load("ViT-L/14", device=device, jit=False)
if device == 'cpu':
net.float()
else:
clip.model.convert_weights(net)
loss_img = nn.CrossEntropyLoss()
loss_txt = nn.CrossEntropyLoss()
optimizer = optim.Adam(net.parameters(), lr=learning_rate, betas=(0.9, 0.98), eps=1e-6, weight_decay=0.2)
train_dateset = MyDataset(processor=preprocess, train=True)
train_loader = DataLoader(train_dateset, batch_size=batch_size, shuffle=True, num_workers=64, pin_memory=True)
test_dataset = MyDataset(processor=preprocess, train=False)
test_loader = DataLoader(test_dataset, batch_size=batch_size, num_workers=64, shuffle=True, pin_memory=True)
print(f'Train dataset size: {len(train_dateset)}\nTest dataset size: {len(test_dataset)}\n')
for epoch in range(num_epochs):
total_epoch_loss = 0
for index, (images, tokens, targets) in tqdm(enumerate(train_loader), total=len(train_loader)):
optimizer.zero_grad()
images = images.to(device)
tokens = tokens.to(device)
with torch.set_grad_enabled(True):
logits_per_image, logits_per_text = net(images, tokens)
ground_truth = torch.arange(len(images), dtype=torch.long, device=device)
cur_loss = (loss_img(logits_per_image, ground_truth) + loss_txt(logits_per_text, ground_truth)) / 2
total_epoch_loss += cur_loss.item()
cur_loss.backward()
if device == 'cpu':
optimizer.step()
else:
convert_models_to_fp32(net)
optimizer.step()
clip.model.convert_weights(net)
test_acc = test(net, test_dataset, test_loader, device)
print(f'Total train loss: {total_epoch_loss:.6f}, Test accuracy: {test_acc:.6%}')
print("----------------------------------------------------------")
torch.save({'epoch': epoch,
'model_state_dict': net.state_dict(),
'optimizer_state_dict': optimizer.state_dict(),
'loss': total_epoch_loss,
}, f"model_checkpoint/model-{epoch + 1}_acc-{test_acc*100:.3f}.pt")
if __name__ == "__main__":
train()
```
## 2.4. 运行过程及结果
```sh
$ conda install --yes -c pytorch pytorch=1.7.1 torchvision cudatoolkit=11.0
$ pip install ftfy regex tqdm
$ pip install git+https://github.com/openai/CLIP.git
```
依次运行上述命令,环境配置完成。
运行代码。
```sh
$ python train.py
```
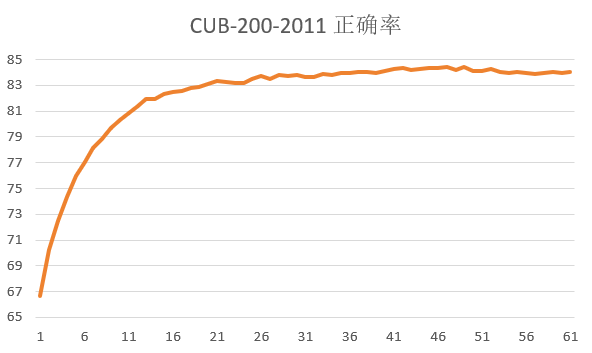
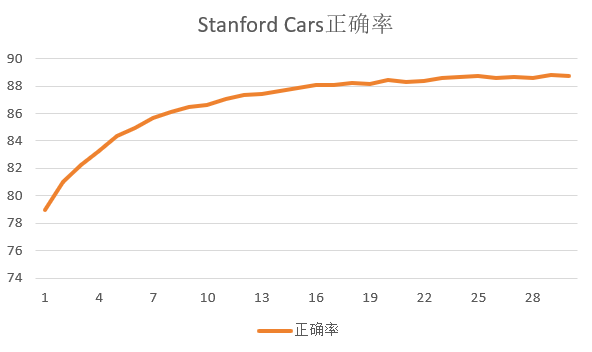
在两个数据集上得到以下结果: