34 KiB
实验报告
目录
[TOC]
1. 直方图均衡化处理程序
本实验中我使用Python实现直方图均衡化处理。对于图像的读取、处理和保存,我都使用了按字节进行读写的方式,符合实验要求。
1.1. BMP格式图片的读写
BMP格式图片的数据分为以下部分:
| 内容 | 大小 |
|---|---|
| bmp文件头(bmp file header) | 14字节 |
| 位图信息头(bitmap information) | 40字节 |
| 调色板(color palette) | 可选 |
| 位图数据 |
这里使用Lenna的BMP格式图片的十六进制码作为解读用例。
1.1.1. BMP文件头内容读取
BMP文件头内容如下:
| 内容 | 大小 | 偏移 | Lenna图片 | 备注 |
|---|---|---|---|---|
| bfType 文件类型 | 2字节 | 0x00 | 0x4D42 | 字符显示就是“BM” |
| bfSize 文件大小 | 4字节 | 0x02 | 0x00010438 | |
| bfReserved1 保留 | 2字节 | 0x06 | 0x00 | 必须设置为0 |
| bfReserved2 保留 | 2字节 | 0x08 | 0x00 | 必须设置为0 |
| bfOffBits 从头到位图数据的偏移 | 4字节 | 0x0A | 0x00000436 | = 文件头大小 + 位图信息头大小 + 调色板大小 |
Lenna图片中数据如下图(使用VS Code的Hex Editor打开):
因此读取代码为:
class BmpData:
    def __init__(self, file_path:str):
        with open(file_path, "rb") as file:
            self.file = file
            self.bfType = unpack("<H", file.read(2))[0] # 0x00 文件类型
            self.bfSize = unpack("<i", file.read(4))[0] # 0x02 文件大小
            self.bfReserved1 = unpack("<H", file.read(2))[0]    # 0x06 保留,必须设置为0
            self.bfReserved2 = unpack("<H", file.read(2))[0]    # 0x08 保留,必须设置为0
            self.bfOffBits = unpack("<i", file.read(4))[0]  # 0x0a 从头到位图数据的偏移
1.1.2. BMP位图信息头读取
BMP位图信息头内容如下:
| 内容 | 大小 | 偏移 | Lenna图片 | 备注 |
|---|---|---|---|---|
| biSize 信息头的大小 | 4字节 | 0x0E | 0x00000028 | |
| biWidth 图像的宽度(以像素为单位) | 4字节 | 0x12 | 0x00000100 | |
| biHeight 图像的高度(以像素为单位) | 4字节 | 0x16 | 0x00000100 | 如果是正的,说明图像是倒立的;反之正立 |
| biPlanes 颜色平面数 | 2字节 | 0x1A | 0x0001 | |
| biBitCount 每像素的比特数 | 2字节 | 0x1C | 0x0008 | |
| biCompression 压缩类型 | 4字节 | 0x1E | 0x00000000 | |
| biSizeImage 位图数据的大小 | 4字节 | 0x22 | 0x00000000 | = 文件大小 - 位图偏移bfOffBits,用BI_RGB格式时可设置为0 |
| biXPelsPerMeter 水平分辨率 | 4字节 | 0x26 | 0x00000B12 | 单位是像素/米,有符号整数 |
| biYPelsPerMeter 垂直分辨率 | 4字节 | 0x2A | 0x00000B12 | 单位是像素/米,有符号整数 |
| biClrUsed 位图使用的调色板中的颜色索引数 | 4字节 | 0x2E | 0x00000000 | 如果是0,说明使用所有颜色 |
| biClrImportant 对图像显示有重要影响的颜色索引数 | 4字节 | 0x32 | 0x00000000 | 如果是0,说明都重要 |
Lenna图片中数据如下图:
因此读取代码为:
            self.biSize = unpack("<i", file.read(4))[0] # 0x0e 信息头的大小
            self.biWidth = unpack("<i", file.read(4))[0]    # 0x12 图像的宽度(以像素为单位)
            self.biHeight = unpack("<i", file.read(4))[0]   # 0x16 图像的高度(以像素为单位)(负说明图像是倒立的)
            self.biPlanes = unpack("<H", file.read(2))[0]   # 0x1a 颜色平面数
            self.biBitCount = unpack("<H", file.read(2))[0] # 0x1c 比特数/像素数
            self.biCompression = unpack("<i", file.read(4))[0]  # 0x1e 压缩类型
            self.biSizeImage = unpack("<i", file.read(4))[0]    # 0x22 位图数据的大小
            self.biXPelsPerMeter = unpack("<i", file.read(4))[0]    # 0x26 水平分辨率
            self.biYPelsPerMeter = unpack("<i", file.read(4))[0]    # 0x2a 垂直分辨率
            self.biClrUsed = unpack("<i", file.read(4))[0]  # 0x2e 位图使用的调色板中的颜色索引数
            self.biClrImportant = unpack("<i", file.read(4))[0] # 0x32 对图像显示有重要影响的颜色索引数(0说明都重要)
1.1.3. BMP调色板读取
调色板是可选的,不过这里的8位色图有调色板。那么接下来的数据就是调色板了。
调色板就是一个颜色的索引,这里是8位色图,一共有256中颜色,由于每个颜色都有RGB三原色,也就是要3个字节表示,这样的话256个颜色就不能表示所有的颜色。
所以需要一个索引,用一个字节的索引指向4个字节表示的颜色(B/G/R/Alpha四个值)。一个颜色用4个字节表示,有N个颜色,那么调色板就是一个N*4的二维数组。
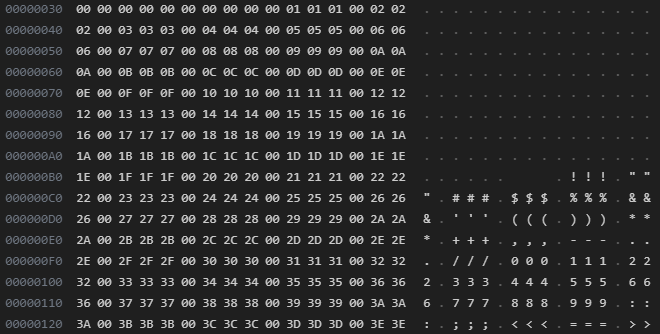
Lenna图片中数据如下图:
调色板数据较长,这里只截了一部分。
可以看出,调色板从0x36开始,是0x00到0xFF顺序排列的B/G/R/Alpha四个值。
不完全列举如下:
| 范围 | 颜色编号 | B | G | R | Alpha |
|---|---|---|---|---|---|
| 0x36 - 0x39 | 0 | 0x00 | 0x00 | 0x00 | 0x00 |
| 0x3A - 0x3D | 1 | 0x01 | 0x01 | 0x01 | 0x01 |
| 0x3E - 0x41 | 2 | 0x02 | 0x02 | 0x02 | 0x02 |
| 0x0042 - 0x0431 | 3 - 256 | ... | ... | ... | ... |
| 0x0432 - 0x0435 | 255 | 0xFF | 0xFF | 0xFF | 0xFF |
这里0x00到0xFF即0到255,能够覆盖所有颜色范围。如果每像素的比特数biBitCount不足8位,那么调色板就不能覆盖所有256个颜色,那么说明图片里没有用到的颜色不会出现在调色板里。
因此读取代码为:
    def get_color_palette(self) -> np.ndarray:
        if (self.bfOffBits == 0x36):  # 16/24位图像不需要调色板,起始位置就等于0x36
            return None
        color_alette_size = 2 ** int(self.biBitCount) # 多少字节调色板颜色就有2^n个
        color_palette = np.zeros((color_alette_size, 3), dtype=np.int32)
        self.file.seek(0x36)
        for i in range(color_alette_size):
            b = unpack("B", self.file.read(1))[0]
            g = unpack("B", self.file.read(1))[0]
            r = unpack("B", self.file.read(1))[0]
            alpha = unpack("B", self.file.read(1))[0]
            color_palette[i][0] = b
            color_palette[i][1] = g
            color_palette[i][2] = r
        return color_palette
1.1.4. BMP位图数据读取
接下来是位图数据。由于是8位色图,所以每个像素用1个字节表示,取出每个字节,从调色盘中获取对应的R/G/B/Alpha数值,忽略掉Alpha值,放入三维数组中,就是图片数据了。如果是24位色图,按照BGR的顺序排列,32位色图按照BGRAlpha排列。
读取颜色值的代码如下:
    def get_RGB(self, pixel_data:str):
        if len(pixel_data) <= 8:
            color_index = int(pixel_data, 2)
            return self.color_palette[color_index]
        elif len(pixel_data) == 16:
            b = int(pixel_data[1:6], 2) * 8
            g = int(pixel_data[6:11], 2) * 8
            r = int(pixel_data[11:16], 2) * 8
            return [r, g, b]
        elif len(pixel_data) == 24:
            b = int(pixel_data[0:8], 2)
            g = int(pixel_data[8:16], 2)
            r = int(pixel_data[16:24], 2)
            return [r, g, b]
        elif len(pixel_data) == 32:
            b = int(pixel_data[0:8], 2)
            g = int(pixel_data[8:16], 2)
            r = int(pixel_data[16:24], 2)
            alpha = int(pixel_data[24:32], 2)
            return [r, g, b]
Lenna图片的biHeight为正数,说明图像倒立,从左下角开始到右上角,以行为主序排列。
位图数据排列还有一个规则,就是对齐。
Windows默认的扫描的最小单位是4字节,如果数据对齐满足这个值的话对于数据的获取速度等都是有很大的增益的。因此,BMP图像顺应了这个要求,要求每行的数据的长度必须是4的倍数,如果不够需要以0填充,这样可以达到按行的快速存取。
每行的的长度为:
Rowsize = 4 \times \left \lceil \frac{bfOffBits \times biWidth}{32} \right \rceil
用代码实现为:
Rowsize = ((biWidth * biBitCount + 31) >> 5) << 2
补零的数量就为:
Rowsize = 4 \times \left \lceil \frac{bfOffBits \times biWidth}{32} \right \rceil - (bfOffBits \times biWidth)
获取图片三维数组的代码如下:
    def get_numpy_img(self) -> np.ndarray:
        biHeight = abs(self.biHeight)
        img_np = np.zeros((biHeight, self.biWidth, 3), dtype=np.int32)
        self.file.seek(self.bfOffBits)
        for x in range(biHeight):
            row_byte_count = ((self.biWidth * self.biBitCount + 31) >> 5) << 2
            row_bits = self.file.read(row_byte_count)
            row_bits = ''.join(format(byte, '08b') for byte in row_bits)
            for y in range(self.biWidth):
                pixel_data = row_bits[y * self.biBitCount: (y + 1) * self.biBitCount]
                if self.biHeight > 0:   # 图像倒立
                    img_np[biHeight - 1 - x][y] = self.get_RGB(pixel_data)
                else:
                    img_np[x][y] = self.get_RGB(pixel_data)
        return img_np
1.1.5. BMP图片的写入
将图片三维数组按照BMP格式写入二进制文件即可。这里我以8位色图写入。
    def save_img(self, image:np.ndarray, save_path:str):
        with open(save_path, "wb") as file:
            file.write(int(self.bfType).to_bytes(2, byteorder='little'))    # 0x00 文件类型
            file.write(int(0x36 + 0x100 * 4 + self.biWidth * abs(self.biHeight)).to_bytes(4, byteorder='little'))   # 0x02 文件大小
            file.write(int(0).to_bytes(4, byteorder='little'))  # 0x06 保留,必须设置为0
            file.write(int(0x36 + 0x100 * 4).to_bytes(4, byteorder='little')) # 0x0a 从头到位图数据的偏移
            file.write(int(40).to_bytes(4, byteorder='little')) # 0x0e 信息头的大小
            file.write(int(self.biWidth).to_bytes(4, byteorder='little'))   # 0x12 图像的宽度
            file.write(int(self.biHeight).to_bytes(4, byteorder='little'))  # 0x16 图像的高度
            file.write(int(self.biPlanes).to_bytes(2, byteorder='little'))  # 0x1a 颜色平面数
            file.write(int(8).to_bytes(2, byteorder='little'))    # 0x1c 比特数/像素数
            file.write(int(self.biCompression).to_bytes(4, byteorder='little')) # 0x1e 压缩类型
            file.write(int(self.biSizeImage).to_bytes(4, byteorder='little'))   # 0x22 位图数据的大小
            file.write(int(self.biXPelsPerMeter).to_bytes(4, byteorder='little'))   # 0x26 水平分辨率
            file.write(int(self.biYPelsPerMeter).to_bytes(4, byteorder='little'))   # 0x2a 垂直分辨率
            file.write(int(0x100 * 4).to_bytes(4, byteorder='little'))  # 0x2e 位图使用的调色板中的颜色索引数
            file.write(int(0).to_bytes(4, byteorder='little'))  # 0x32 对图像显示有重要影响的颜色索引数

            for i in range(256):
                file.write(int(i).to_bytes(1, byteorder='little'))
                file.write(int(i).to_bytes(1, byteorder='little'))
                file.write(int(i).to_bytes(1, byteorder='little'))
                file.write(int(0).to_bytes(1, byteorder='little'))

            for x in range(abs(self.biHeight)):
                for y in range(self.biWidth):
                    if self.biHeight > 0:
                        file.write(int(image[self.biHeight - 1 - x][y]).to_bytes(1, byteorder='little'))
                    else:
                        file.write(int(image[x][y]).to_bytes(1, byteorder='little'))
                file.write(b'0' * ((((self.biWidth * 8 + 31) >> 5) << 2) - 8 * self.biWidth))

            file.close()
1.2. 直方图均衡化处理
直方图均衡化的步骤如下:
- 将彩色图转换为灰度图;
- 统计每个色阶的像素数,转换为频率;
- 将各个色阶的频率依次累加,得到前缀和;
- 将各个色阶的频率前缀和转换到相近的灰度色阶值,作为该色阶内像素的均衡化后的灰度值;
- 将原图的各个像素变换到对应得到灰度值。
1.2.1. 灰度化
这里灰度化的方法采用
grey\space value=0.299\times R + 0.587 \times G + 0.114\times B
灰度转化代码如下:
    def get_gray_img(self) -> np.ndarray:
        biHeight = abs(self.biHeight)
        gray_img = np.dot(self.img_np.reshape((biHeight * self.biWidth, 3)).astype(np.float32),
                          [0.299, 0.587, 0.114]).astype(np.int32)
        gray_img = gray_img.reshape((biHeight, self.biWidth))
        return gray_img
1.2.2. 直方图均衡化
按照步骤,均衡化代码如下:
    def equalize(self, level:int):
        biHeight = abs(self.biHeight)
        self.hist = np.zeros(256, dtype=np.int32)
        max_value = self.gray.max()
        min_value = self.gray.min()
        gap = (max_value - min_value + 1) / level
        for x in range(biHeight):
            for y in range(self.biWidth):
                self.hist[self.gray[x, y]] += 1
        hist = np.zeros(level, dtype=np.float32)
        for i in range(level):
            hist[i] = np.sum(self.hist[min_value + int(i * gap) : min_value + int((i + 1) * gap)])
        hist /= biHeight * self.biWidth
        for i in range(1, level):
            hist[i] += hist[i - 1]
        hist *= level
        hist = np.around(hist)
        hist /= level
        hist = np.floor(hist * 255).astype(np.int32)
        self.equalized_img = np.zeros_like(self.gray)
        self.equalized_hist = np.zeros(256, dtype=np.int32)
        for x in range(biHeight):
            for y in range(self.biWidth):
                self.equalized_img[x, y] = hist[int((self.gray[x, y] - min_value) / gap)]
                self.equalized_hist[self.equalized_img[x, y]] += 1
        return self.equalized_img, self.hist, self.equalized_hist
1.3. GUI界面设计和程序逻辑
def choosepic():
    global path_
    path_ = tkinter.filedialog.askopenfilename(title='请选择图片文件', filetypes=[('图片', '.bmp')])
    if path_ == '':
        return
    img_temp = Image.open(path_).resize((int(256 * 0.8), int(256 * 0.8)))  # 图片读取和加载
    img = ImageTk.PhotoImage(img_temp)
    label_image1.config(image=img)
    label_image1.image = img


def equalize():
    if path_ == '':
        return
    image = BmpData(path_)
    # img = Image.fromarray(image.img_np.astype(np.uint8))
    # img.show()

    equalized_img, hist, equalized_hist = image.equalize(8) # 分别为均衡化的图/直方图/均衡化后的直方图
    equalized_img = Image.fromarray(equalized_img.astype(np.uint8))
    # equalized_img.show()

    name_parts = path_.split('.')
    name_parts[-2] += "_equalized"
    new_file_name = '.'.join(name_parts)
    image.save_equalized_img(new_file_name)

    equalized_img = equalized_img.resize((int(256 * 0.8), int(256 * 0.8)))
    equalized_img = ImageTk.PhotoImage(equalized_img)
    label_image2.config(image=equalized_img)
    label_image2.image = equalized_img  # 处理后的图片的显示


if __name__ == "__main__":
    root = tkinter.Tk()
    root.title('21281280柯劲帆')  # 标题
    width, height = 600, 400
    width_max, height_max = root.maxsize()
    s_center = '%dx%d+%d+%d' % (width, height, (width_max - width) / 2, (height_max - height) / 2)  # 将页面显示在正中间
    root.geometry(s_center)
    root.resizable(width=False, height=False)  # 窗口不可移动
    l = tkinter.Label(root, text='实验二', width=60, height=2, fg='black', font=("微软雅黑", 16), anchor=tkinter.CENTER)
    l.pack()

    label_image1 = tkinter.Label(root, width=int(256 * 0.8), height=int(256 * 0.8), bg='whitesmoke', anchor=tkinter.NE)
    label_image1.pack()
    label_image1.place(x=45, y=70, width=int(256 * 0.8), height=int(256 * 0.8))

    label_image2 = tkinter.Label(root, width=int(256 * 0.8), height=int(256 * 0.8), bg='whitesmoke', anchor=tkinter.NE)
    label_image2.place(x=350, y=70, width=int(256 * 0.8), height=int(256 * 0.8))

    # 文本按钮
    Image_Input = tkinter.Button(root, text='Choose', command=choosepic)
    Image_Input.place(x=105, y=300, width=80, height=30)

    # 直方图均衡化
    Fun1 = tkinter.Button(root, text='直方图均衡化', command=equalize)
    Fun1.place(x=265, y=300, width=80, height=30)

    # 退出
    Quit = tkinter.Button(root, text='Quit', command=sys.exit)
    Quit.place(x=415, y=300, width=80, height=30)

    end = tkinter.Label(root, text='21281280 柯劲帆', fg='silver', font=("微软雅黑", 10))
    end.place(x=215, y=360, width=200, height=20)
    root.mainloop()
2. 实验过程
编好代码后,对Python代码进行封装,变成exe可执行程序。
在命令行中配置环境并封装:
> pip install pyinstaller
> Pyinstaller -F -w read_bmp.py
在文件资源管理器窗口中双击exe文件,即可运行。
3. 实验结果及分析
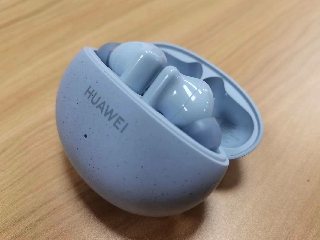
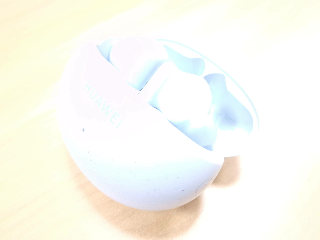
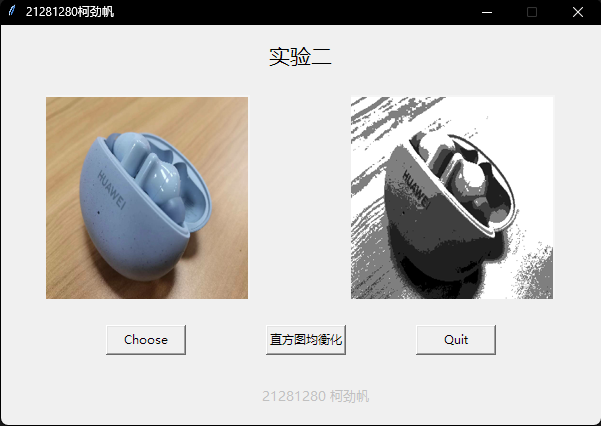
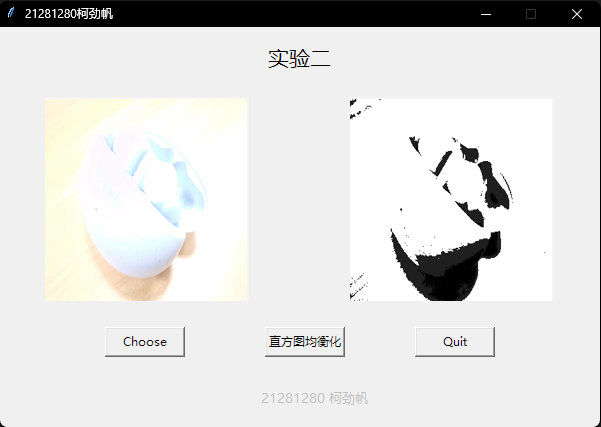
这里我准备了手机拍摄的3张图片,图片内容相同,但是在拍摄的过程中调整亮度,得到3张(偏暗、正常、偏亮)的图片,直方图均衡化处理如下:
| 偏暗 | 正常 | 偏亮 | |
| 原图 | 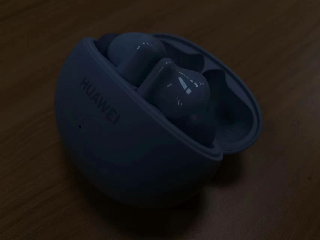 |
 |
 |
| 直方图均衡化过程 | 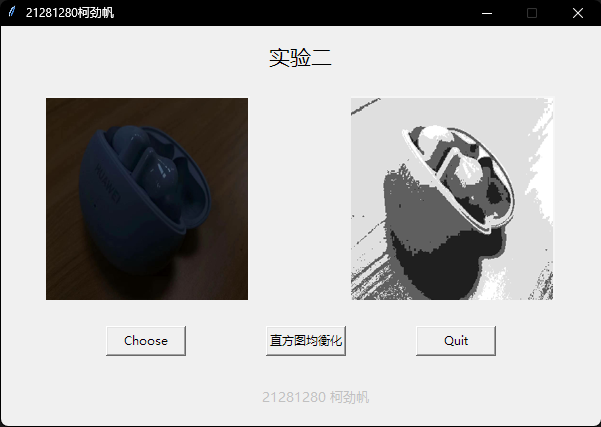 |
 |
 |
| 直方图均衡化结果 |  |
 |
 |
可见偏暗的图进行直方图均衡化处理后,辨识度增加;
正常的图进行直方图均衡化处理后,由于将颜色集中到几个色阶上,所以层次感增强;
偏亮的图进行直方图均衡化处理后,效果不好,辨识度甚至下降了。
4. 心得体会
在本次直方图均衡化处理的数字图像处理实验中,我学习和掌握了以下几点:
- 熟练掌握了BMP格式图片的读取和写入,包括文件头、信息头、调色板以及位图数据的解析。这让我对图像文件的格式和结构有了更深入的理解。
- 实现了直方图均衡化处理的关键步骤,包括灰度化、计算直方图、直方图均衡化变换等。这让我对直方图均衡化算法的原理有了更清晰的认识。
- 通过编程实现直方图均衡化处理,并通过对不同曝光的图片进行处理,观察结果发现:偏暗图片效果好,正常图片层次增强,偏亮图片效果不佳。这让我理解到直方图均衡化处理的适用场景。
- 熟练使用Python中的Numpy、PIL等库进行图像处理,并编写GUI界面。这进一步提高了我的编程能力。
- 通过把Python代码打包成exe文件,实现可直接运行。这让我掌握了把代码封装成软件产品的方法。
通过本次实验,我对数字图像处理理论知识和编程实现能力都得到了提高。
5. 源代码
import numpy as np
from struct import unpack
from PIL import Image, ImageTk
import sys
import tkinter
import tkinter.filedialog

class BmpData:
    def __init__(self, file_path:str):
        with open(file_path, "rb") as file:
            self.file = file

            self.bfType = unpack("<H", file.read(2))[0] # 0x00 文件类型
            self.bfSize = unpack("<i", file.read(4))[0] # 0x02 文件大小
            self.bfReserved1 = unpack("<H", file.read(2))[0]    # 0x06 保留,必须设置为0
            self.bfReserved2 = unpack("<H", file.read(2))[0]    # 0x08 保留,必须设置为0
            self.bfOffBits = unpack("<i", file.read(4))[0]  # 0x0a 从头到位图数据的偏移
            self.biSize = unpack("<i", file.read(4))[0] # 0x0e 信息头的大小
            self.biWidth = unpack("<i", file.read(4))[0]    # 0x12 图像的宽度(以像素为单位)
            self.biHeight = unpack("<i", file.read(4))[0]   # 0x16 图像的高度(以像素为单位)(负说明图像是倒立的)
            self.biPlanes = unpack("<H", file.read(2))[0]   # 0x1a 颜色平面数
            self.biBitCount = unpack("<H", file.read(2))[0] # 0x1c 比特数/像素数
            self.biCompression = unpack("<i", file.read(4))[0]  # 0x1e 压缩类型
            self.biSizeImage = unpack("<i", file.read(4))[0]    # 0x22 位图数据的大小
            self.biXPelsPerMeter = unpack("<i", file.read(4))[0]    # 0x26 水平分辨率
            self.biYPelsPerMeter = unpack("<i", file.read(4))[0]    # 0x2a 垂直分辨率
            self.biClrUsed = unpack("<i", file.read(4))[0]  # 0x2e 位图使用的调色板中的颜色索引数
            self.biClrImportant = unpack("<i", file.read(4))[0] # 0x32 对图像显示有重要影响的颜色索引数(0说明都重要)

            self.color_palette = self.get_color_palette()
            self.img_np = self.get_numpy_img()
            self.gray = self.get_gray_img()
            file.close()

    def get_color_palette(self) -> np.ndarray:
        if (self.bfOffBits == 0x36):  # 16/24位图像不需要调色板,起始位置就等于0x36
            return None
        color_alette_size = 2 ** int(self.biBitCount) # 多少字节调色板颜色就有2^n个
        color_palette = np.zeros((color_alette_size, 3), dtype=np.int32)
        self.file.seek(0x36)
        for i in range(color_alette_size):
            b = unpack("B", self.file.read(1))[0]
            g = unpack("B", self.file.read(1))[0]
            r = unpack("B", self.file.read(1))[0]
            alpha = unpack("B", self.file.read(1))[0]
            color_palette[i][0] = b
            color_palette[i][1] = g
            color_palette[i][2] = r
        return color_palette

    def get_numpy_img(self) -> np.ndarray:
        biHeight = abs(self.biHeight)
        img_np = np.zeros((biHeight, self.biWidth, 3), dtype=np.int32)
        self.file.seek(self.bfOffBits)
        for x in range(biHeight):
            row_byte_count = ((self.biWidth * self.biBitCount + 31) >> 5) << 2
            row_bits = self.file.read(row_byte_count)
            row_bits = ''.join(format(byte, '08b') for byte in row_bits)
            for y in range(self.biWidth):
                pixel_data = row_bits[y * self.biBitCount: (y + 1) * self.biBitCount]
                if self.biHeight > 0:   # 图像倒立
                    img_np[biHeight - 1 - x][y] = self.get_RGB(pixel_data)
                else:
                    img_np[x][y] = self.get_RGB(pixel_data)
        return img_np

    def get_gray_img(self) -> np.ndarray:
        biHeight = abs(self.biHeight)
        gray_img = np.dot(self.img_np.reshape((biHeight * self.biWidth, 3)).astype(np.float32),
                          [0.299, 0.587, 0.114]).astype(np.int32)
        gray_img = gray_img.reshape((biHeight, self.biWidth))
        return gray_img

    def get_RGB(self, pixel_data:str):
        if len(pixel_data) <= 8:
            color_index = int(pixel_data, 2)
            return self.color_palette[color_index]
        elif len(pixel_data) == 16:
            b = int(pixel_data[1:6], 2) * 8
            g = int(pixel_data[6:11], 2) * 8
            r = int(pixel_data[11:16], 2) * 8
            return [r, g, b]
        elif len(pixel_data) == 24:
            b = int(pixel_data[0:8], 2)
            g = int(pixel_data[8:16], 2)
            r = int(pixel_data[16:24], 2)
            return [r, g, b]
        elif len(pixel_data) == 32:
            b = int(pixel_data[0:8], 2)
            g = int(pixel_data[8:16], 2)
            r = int(pixel_data[16:24], 2)
            alpha = int(pixel_data[24:32], 2)
            return [r, g, b]


    def equalize(self, level:int):
        biHeight = abs(self.biHeight)
        self.hist = np.zeros(256, dtype=np.int32)
        max_value = self.gray.max()
        min_value = self.gray.min()
        gap = (max_value - min_value + 1) / level
        for x in range(biHeight):
            for y in range(self.biWidth):
                self.hist[self.gray[x, y]] += 1
        hist = np.zeros(level, dtype=np.float32)
        for i in range(level):
            hist[i] = np.sum(self.hist[min_value + int(i * gap) : min_value + int((i + 1) * gap)])
        hist /= biHeight * self.biWidth
        for i in range(1, level):
            hist[i] += hist[i - 1]
        hist *= level
        hist = np.around(hist)
        hist /= level
        hist = np.floor(hist * 255).astype(np.int32)
        self.equalized_img = np.zeros_like(self.gray)
        self.equalized_hist = np.zeros(256, dtype=np.int32)
        for x in range(biHeight):
            for y in range(self.biWidth):
                self.equalized_img[x, y] = hist[int((self.gray[x, y] - min_value) / gap)]
                self.equalized_hist[self.equalized_img[x, y]] += 1
        return self.equalized_img, self.hist, self.equalized_hist

    def save_equalized_img(self, save_path:str):
        self.save_img(image=self.equalized_img, save_path=save_path)

    def save_img(self, image:np.ndarray, save_path:str):
        with open(save_path, "wb") as file:
            file.write(int(self.bfType).to_bytes(2, byteorder='little'))    # 0x00 文件类型
            file.write(int(0x36 + 0x100 * 4 + self.biWidth * abs(self.biHeight)).to_bytes(4, byteorder='little'))   # 0x02 文件大小
            file.write(int(0).to_bytes(4, byteorder='little'))  # 0x06 保留,必须设置为0
            file.write(int(0x36 + 0x100 * 4).to_bytes(4, byteorder='little')) # 0x0a 从头到位图数据的偏移
            file.write(int(40).to_bytes(4, byteorder='little')) # 0x0e 信息头的大小
            file.write(int(self.biWidth).to_bytes(4, byteorder='little'))   # 0x12 图像的宽度
            file.write(int(self.biHeight).to_bytes(4, byteorder='little'))  # 0x16 图像的高度
            file.write(int(self.biPlanes).to_bytes(2, byteorder='little'))  # 0x1a 颜色平面数
            file.write(int(8).to_bytes(2, byteorder='little'))    # 0x1c 比特数/像素数
            file.write(int(self.biCompression).to_bytes(4, byteorder='little')) # 0x1e 压缩类型
            file.write(int(self.biSizeImage).to_bytes(4, byteorder='little'))   # 0x22 位图数据的大小
            file.write(int(self.biXPelsPerMeter).to_bytes(4, byteorder='little'))   # 0x26 水平分辨率
            file.write(int(self.biYPelsPerMeter).to_bytes(4, byteorder='little'))   # 0x2a 垂直分辨率
            file.write(int(0x100 * 4).to_bytes(4, byteorder='little'))  # 0x2e 位图使用的调色板中的颜色索引数
            file.write(int(0).to_bytes(4, byteorder='little'))  # 0x32 对图像显示有重要影响的颜色索引数

            for i in range(256):
                file.write(int(i).to_bytes(1, byteorder='little'))
                file.write(int(i).to_bytes(1, byteorder='little'))
                file.write(int(i).to_bytes(1, byteorder='little'))
                file.write(int(0).to_bytes(1, byteorder='little'))

            for x in range(abs(self.biHeight)):
                for y in range(self.biWidth):
                    if self.biHeight > 0:
                        file.write(int(image[self.biHeight - 1 - x][y]).to_bytes(1, byteorder='little'))
                    else:
                        file.write(int(image[x][y]).to_bytes(1, byteorder='little'))
                file.write(b'0' * ((((self.biWidth * 8 + 31) >> 5) << 2) - 8 * self.biWidth))

            file.close()


def choosepic():
    global path_
    path_ = tkinter.filedialog.askopenfilename(title='请选择图片文件', filetypes=[('图片', '.jpg .png .bmp .jpeg')])
    if path_ == '':
        return
    img_temp = Image.open(path_).resize((int(256 * 0.8), int(256 * 0.8)))  # 图片读取和加载
    img = ImageTk.PhotoImage(img_temp)
    label_image1.config(image=img)
    label_image1.image = img


def equalize():
    if path_ == '':
        return
    image = BmpData(path_)
    # img = Image.fromarray(image.img_np.astype(np.uint8))
    # img.show()

    equalized_img, hist, equalized_hist = image.equalize(8) # 分别为均衡化的图/直方图/均衡化后的直方图
    equalized_img = Image.fromarray(equalized_img.astype(np.uint8))
    # equalized_img.show()

    name_parts = path_.split('.')
    name_parts[-2] += "_equalized"
    new_file_name = '.'.join(name_parts)
    image.save_equalized_img(new_file_name)

    equalized_img = equalized_img.resize((int(256 * 0.8), int(256 * 0.8)))
    equalized_img = ImageTk.PhotoImage(equalized_img)
    label_image2.config(image=equalized_img)
    label_image2.image = equalized_img  # 处理后的图片的显示


if __name__ == "__main__":
    root = tkinter.Tk()
    root.title('21281280柯劲帆')  # 标题
    width, height = 600, 400
    width_max, height_max = root.maxsize()
    s_center = '%dx%d+%d+%d' % (width, height, (width_max - width) / 2, (height_max - height) / 2)  # 将页面显示在正中间
    root.geometry(s_center)
    root.resizable(width=False, height=False)  # 窗口不可移动
    l = tkinter.Label(root, text='实验二', width=60, height=2, fg='black', font=("微软雅黑", 16), anchor=tkinter.CENTER)
    l.pack()

    label_image1 = tkinter.Label(root, width=int(256 * 0.8), height=int(256 * 0.8), bg='whitesmoke', anchor=tkinter.NE)
    label_image1.pack()
    label_image1.place(x=45, y=70, width=int(256 * 0.8), height=int(256 * 0.8))

    label_image2 = tkinter.Label(root, width=int(256 * 0.8), height=int(256 * 0.8), bg='whitesmoke', anchor=tkinter.NE)
    label_image2.place(x=350, y=70, width=int(256 * 0.8), height=int(256 * 0.8))

    # 文本按钮
    Image_Input = tkinter.Button(root, text='Choose', command=choosepic)
    Image_Input.place(x=105, y=300, width=80, height=30)

    # 直方图均衡化
    Fun1 = tkinter.Button(root, text='直方图均衡化', command=equalize)
    Fun1.place(x=265, y=300, width=80, height=30)

    # 退出
    Quit = tkinter.Button(root, text='Quit', command=sys.exit)
    Quit.place(x=415, y=300, width=80, height=30)

    end = tkinter.Label(root, text='21281280 柯劲帆', fg='silver', font=("微软雅黑", 10))
    end.place(x=215, y=360, width=200, height=20)
    root.mainloop()


